 Click here
Holmfirth Edge
(or "Cliff" to the locals)
Grid Reference SE 147085
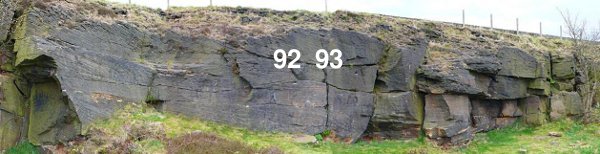
Holmfirth Edge comprises a series of short quarried gritstone aretes and bays.
The left-hand and central sections have several lock-up garages nestling at their base. There are problems here plus some very impressive high-balls, mainly V0-E3, these are not described here yet. There are also a few smaller buttresses beyond the left hand end of Cliff with some worthwhile problems, an update to the guide is in the pipeline which will include the best of these.
The right-hand end of Cliff is lower in height, more varied and has a pleasant footpath below and above. The flat grassy/heathery base plus the view makes for a rather nice picnic spot.
The crag has a splendid and very open outlook over the small town below and towards the main Pennines.
The crag offers a little grafitti though it can't match nearby West Vale for cultural references. A recent BMC initiative led to the removal of the most unpleasant examples. The quarry's north-west outlook means that it is not at its best in wet spells when the left walls of the many aretes become very green. Dry sunny evenings in the mid-seasons are probably best.
The rock is solid gritstone with sandy patches in the lower half but has a flaggy top which can be loose. For the latter reason Cliff has gained literary notoriety, consequently, the quarry is best used for bouldering, using suitable escapes along midway breaks and platforms, although full-height routes are equally possible. Most of the bouldering described here is fairly low, however one feature of the quarry is a small jutting rock shelf at the base of some of the bouldering sections which can threaten ankles... be aware! Remember: climbing is a dangerous activity and you do it (even bouldering) at your own risk. Take care with that ground-level shelf (ankles), the high level flaggy finishes (potentially lethal) and keep an eye out for local youths who may jettison 'empties' from the footpath above the crag.
All in all, not a major venue but one which is very handy for the locals and worth an evening's intensive session from keen boulderers elsewhere in the region. The crag has been climbed on for at least 45 years (if not more) and is, as they say, steeped in history. As with Fontainbleau, more than one local has trained on Everest in preparation for their home venue.
Names of problems have been provided by Brian Cropper who kindly researched the minds and diaries of the ancients. Other names have been taken from Daimon Beail's notes in the Connoisseur section of the 1998 Yorkshire Gritstone guide.
ACCESS
Holmfirth Edge is the long low quarry which overlooks Holmfirth centre from the rim of the south-east skyline, it is quite obvious on approaches from the Manchester side of the Pennines but less obvious from elsewhere.
By car:
From 'the' traffic lights in Holmfirth, go down the short shopping drag (Victoria Street) and swing left over the bridge as if going towards New Mill. After 0.4 miles, slant off right up Town End Road. After another 0.4 miles, just as the road levels, turn hard right onto Cliff Road. After yet another 0.4 miles, a small track splits a cluster of terraced houses; the quarry is above and behind the houses, the described bouldering is at the right-hand end.
Following a recent meeting with the owners of the crag and the local residents, climbers were asked to be more careful when parking not to block drive ways or park in front of people houses.
When visiting Cliff please park away from the houses at the foot of the track as the residents there have problems parking.
There is plenty of parking back up Cliff Road towards its junction with Cliff Lane, which is better, away from any houses and also provides a little warm up walk in
By foot:
From the main bridge, near the bus station in the centre of Holmfirth, turn onto Dunford Road. Immediately, turn steeply left up the vertiginous South Lane. Halfway to exhaustion, turn off left onto New Laithe Lane. This eventually meets Cliff Road. Cross this onto the dirt road which runs along the top of the quarry. 15 minutes in total. There are even more direct, verging on vertical, approaches via classic, 'Hovis Advert' style ginnels for which Holmfirth is famous. Discover these at your pleasure and get fit using them!
![]() An easy to print PDF TOPO guide to all the problems can be downloaded from here
An easy to print PDF TOPO guide to all the problems can be downloaded from here
BETA ALERT!
Click on the camera icon ![]() to view images of the problems being climbed or click on the video icon
to view images of the problems being climbed or click on the video icon  to view videos of the problems being climbed.
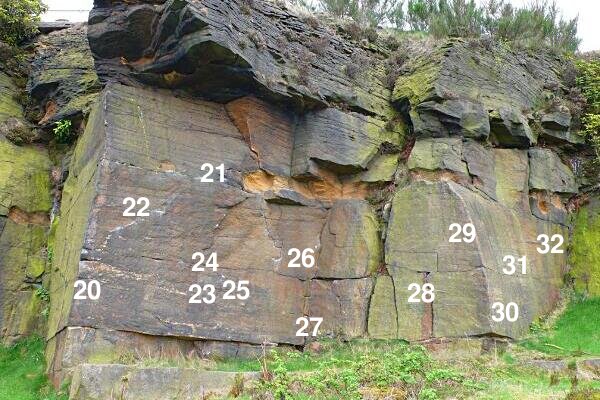
The Problems
Hovering your mouse over, or clicking on, the name/grade of the problem will show the problem highlighted on the topo photograph below.
The Problems are described from left to right. Thirty-five metres to the right of where the track comes up from Cliff Road (and just past the first bunch of trees) are two slabby faces.
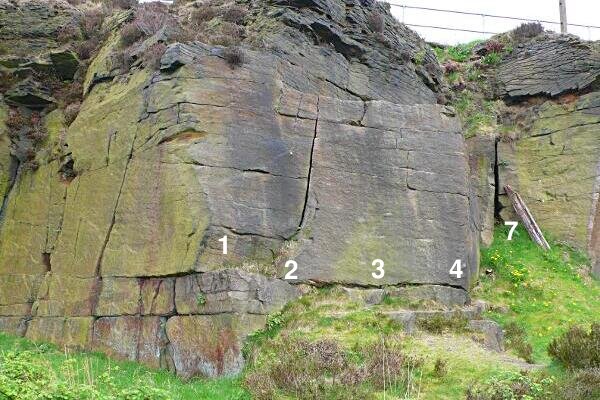
On the FIRST SLAB is:
1) DEVS - Font 4 The left edge of the slabby face. Hop on awkwardly and exit rightwards to the shelf.
2) SCAR FACE - Font 4 The crack in the slab is also more awkward than it looks.
3) BUMBACHUM - Font 5 The slab immediately right of the crack is particularly reach-dependent.
4) ARSENIC SLAB - Font 3 The right-hand side of the slab is also the descent.
The right side-wall of First Slab is steeper:
5) OLD LACE - Font 6c From an obvious awkward side-hold, lurch up for a sloper then the top.
6) CRIMP AND POP - Font 4 (for the top).
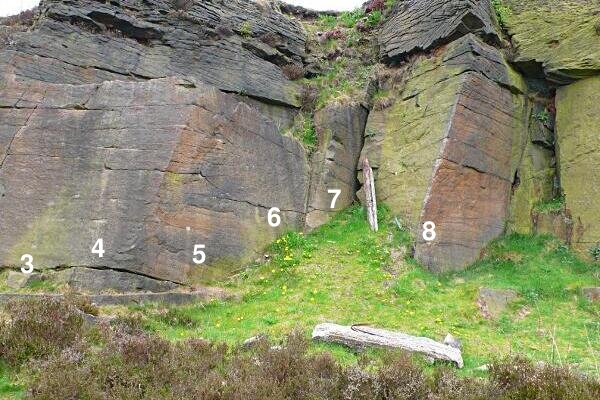
In the adjacent corner is a tiny, innocuous-looking rib and a fantastic overhanding arete:
7) RIBLET - Font 5+ Make a strangely awkward sitting start from a polished foothold. No bridging! Rib only!
8) UPSIDE DOWN ARETE - Font 6b+ Just right is an obvious clean arete which shouts: "Try me!" Climb its right-hand side. The consequences of a slip is often a surprisingly long hop, skip and as the name says....
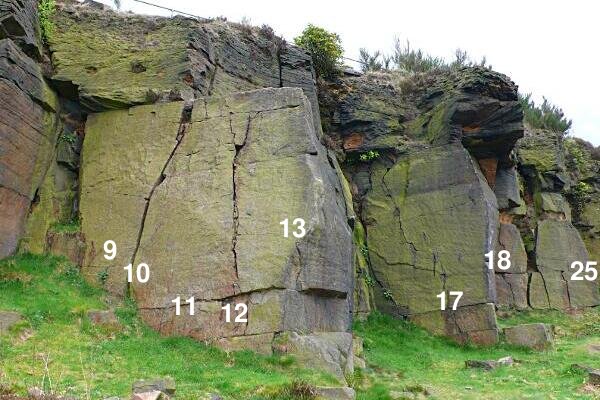
The dusty slab to the right, SECOND SLAB, has two obvious cracks... popular despite its green lichen:
9) Font 5+ The wall immediately left of the left-hand crack.Take a brush.
10) THE LEFT CRACK - Font 3 The wide left-hand crack. No tick unless you use at least one hand-jam.
11) Font 5+ The slab between the cracks... (hands off those cracks!)
12) THE RIGHT CRACK - Font 3 The right-hand crack.
13) Font 5 The right-hand edge of the slab gets a bit high-ball. You can also start on the right-hand side of the arete (to the obvious sloper), harder, and end up back on the easy side!
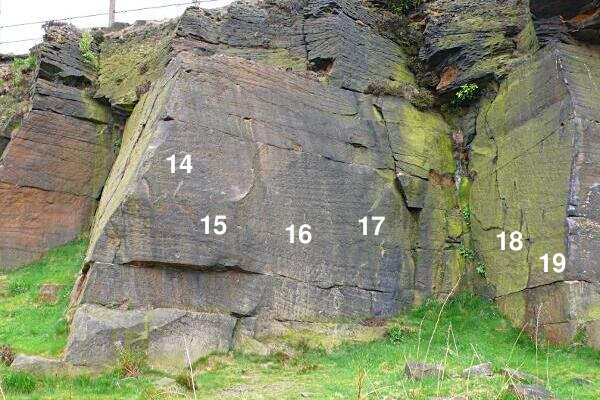
14) Font 7a Eliminate between the arete and Silent Running
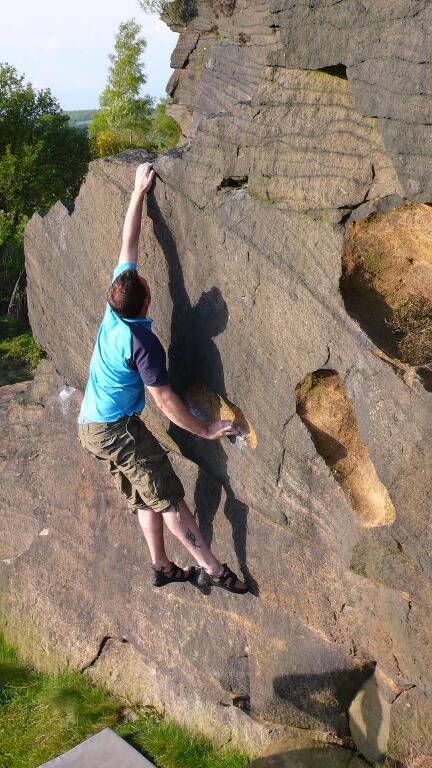
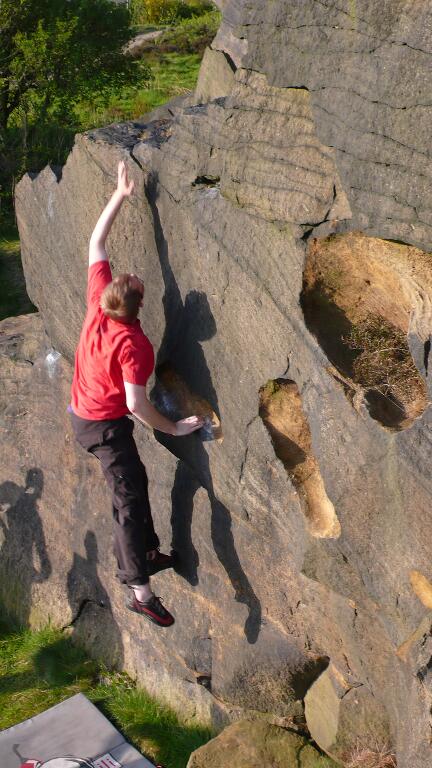
15) SILENT RUNNING - Font 6a+ The crag classic has a high-ball feel (even though things ease with height). Two metres right of the arete, use the chipped holds to step up right then back left into the slight scoop... then upwards.
16) MAD MANTEL - Font 7a+ The centre of the wall. Watch that ankle-ledge!
17) Font 6a Aim for a small ramp (at 2m) at the right-hand end of the wall then gain the break. No using the obvious flake/block to its right.
Across the corner is another angular buttress; it is capped by an impressive set of overhangs:
18) SPIDER - Font 5+ The left wall to a slot at mid-height. Escape left. Continue up Steel Finger Wall if you like high-balls.
19) FIRST ARETE - Font 5+ The main arete, on its left side, to an escape (either direction) at mid-height. The upper half of the arete (a quarried Archangel) is harder, scarier and something other than fun bouldering.
20) Font 5+ The same arete but on its right-hand side; again escape when it ceases to be fun.
21) AT YOUR OWN RISK - Font 6a A traverse. Start at the foot of Spider and move across rightwards, and very low, to First Arete. Move round the arete, then up to an obvious rising hand-ramp. Swing along jugs to the sandy scoop at the top of Shades of Orion then climb/jump/fall down this (which is easier than going up it!). Or finish left.
22) Font 5+ The rising hand ramp
23) Font 6a The attractive wall just right of the small ramp has three problems starting from its centre. The first one steps up for a tiny spike (right-hand) on a faint feature, then rocks up left to the hand-ramp.
24) Font 7a Direct finish for 23. Go for the top break from the right hand spike, sharp and very harsh.
25) HOLMEWARD BOUND - Font 6c This time, leave the tiny spike (left hand, this time) via a hard rock-over and long reach up to the right for a hold that's not actually there. Classic. Easier for the tall.
26) SHADES OF ORION - Font 5+ Holds at the right-hand end of the wall lead surprisingly awkwardly to the sandy scoop.
27) Font 6b+ Another traverse. Start at the base of Shades of Orion and traverse left at a low level with crimpy fingers and sneaky footwork. Stay low (harder) or use that spike as in Problem 23 to reach the hand-ramp.
28) THE UNDERCUT PROBLEM - Font 6a Beyond the easy corner is another short arete. The wall just to its left is good, no arete, only the triangular hole for hands and a pounce for the top.
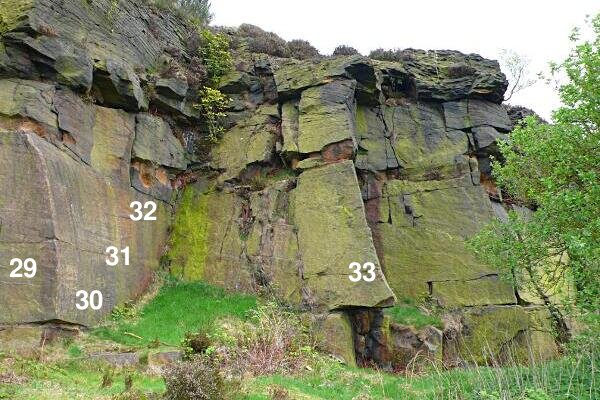
29) THE SHORT ARETE - Font 3 (on its left side).
30) Font 5 The right-hand side of The Short Arete.

31) Font 6a+ Two metres to the right of The Short Arete, the centre of the small wall is an absolute pig to start. Basically, you dyno off your thumb (!) to the top. Easy to impossible, dependent on stature and temperature.
32) Font 4 An easier version is to start in the corner at the right-hand side of the small wall, then hand traverse left to The Short Arete. Keep on going (is there a choice?) and descend the wide blocky corner near Shades of Orion.
To the right is a nosey (undercut) arete:
33) UNCLE LUBIN - Font 5+ Swarm up from a hanging start onto the pleasant nosey arete. No bridging, just use the blocks at the back. Knees are 'in'.
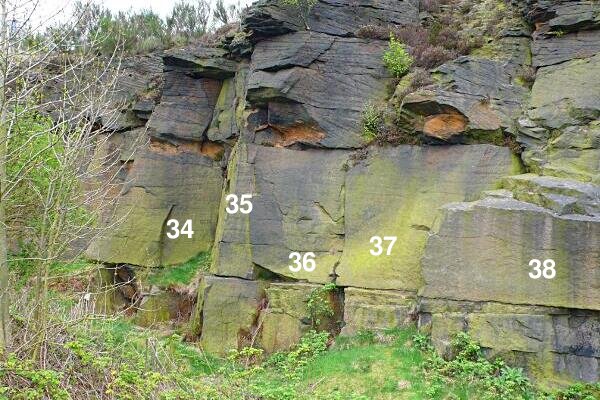
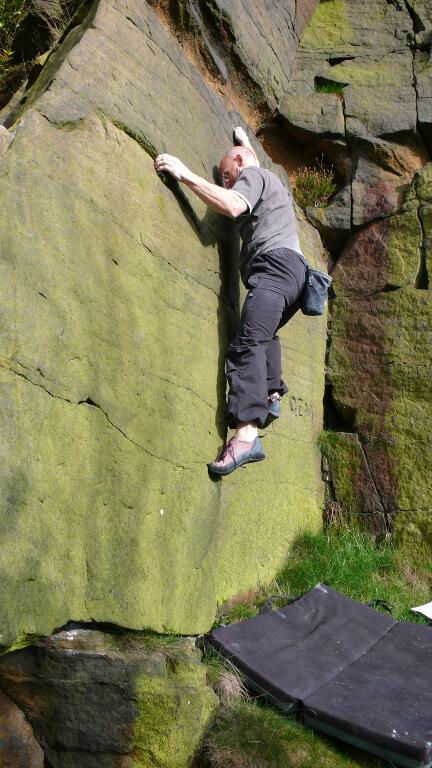
34) GEM - Font 6a Immediately right of the nosey arete is a tiny groove, just left of the carved letters/graffiti ("CEM"). Stretch up the little groove to the sandy break.
35) Font 3 The pleasant arete 3m to the right of the GEM and FH graffiti. Escape left is sensible.
36) SEEKING SANCTUARY - Font 3 Go up the slab 2m to the right of the arete, to the break. This was originally a route going all the way to the top, details of this on the upcoming routes page.
37) Font 3 Slab to the right of Seeking Sanctuary
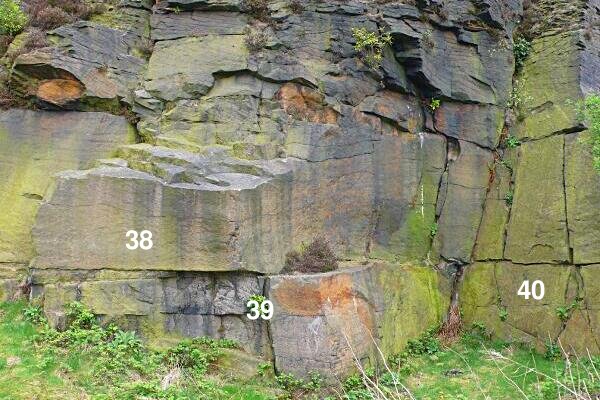
A low wall, below shelves, extends to the right into a hollow. A faint arete marks the right edge of the higher shelf.
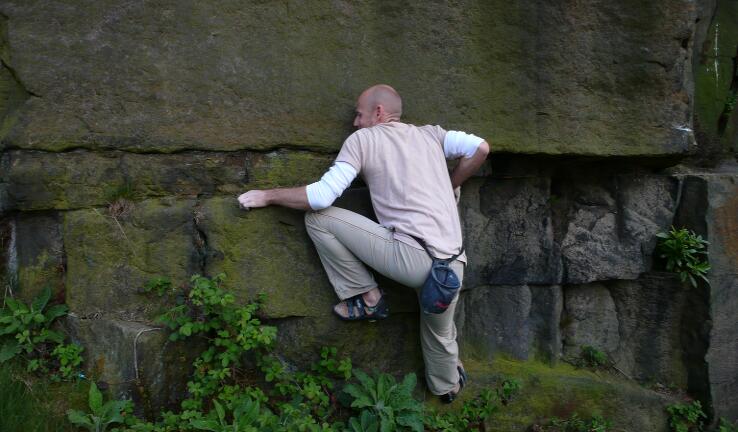
38) BRAMBLES - Font 4 Not significant but a sweet little traverse, starting at Problem 39 and moving back left and up.
39) Font 6a The faint arete is undercut by a small recess. It's just about worthwhile if treated as an complete eliminate, so allow one foothold only, just a single smear on the small rib to the right. Then pounce for the top.
Across the bay, where the ground rises, is another arete:
40) CRYSTAL CRACK - Font 4 In the wall to the left of the arete, is quite good despite the muck. The narrow eliminate wall just left of the crack is the hard Dark Crystal; needs cleaning
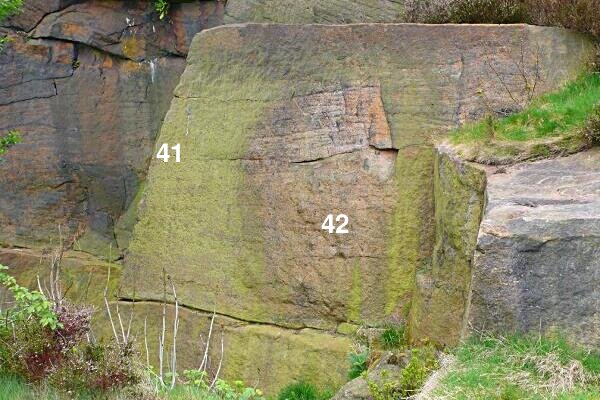
41) CRYSTAL ARETE - Font 5+ The right-hand side of the arete with a horrid move off the ledge.
42) Font 3 Pop up the side-wall, 2m right of the arete.

Back up out of the pit is a small buttress with sandy pockets, LITTLE DYNO WALL:
43) Font 4 From a hand-slot at the left-hand side of the small buttress, rock up for the top.
44) Font 6b+ Dyno to the top from the small sharp crimp in the centre of the face.
45) Font 6a At the centre of the wall, dyno to the top from right hand in the sandy pocket.

46) FLIGHT ATTENDANT - Font 6a+ From the sandy pocket, dead-point precisely for a neat slot/hole then top out.A classic problem.
47) Font 5 Traverse the wall nicely from left to right then rise up the sandy pockets before moving back left to finish on the ledge.
48) ORBITAL - Font 6b+ Start from the flake on the left, follow the traverse, 44, then up into Flight Attendant, hand traverse down the top of the ridge to the start and then go around again. Pumpy.
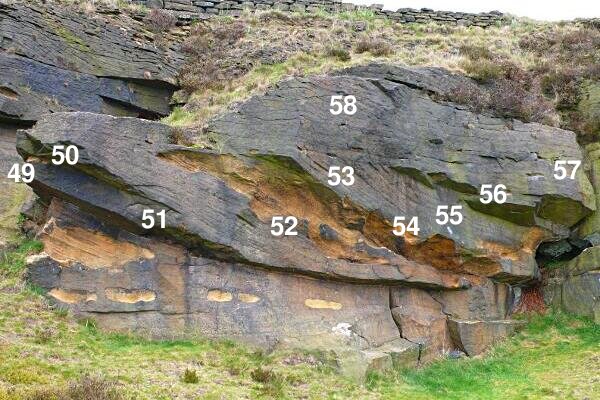
SANDY BUTTRESS is the long, relatively steep, slightly high, corroded buttress 15m to the right:
49) BLUNT ARETE - Font 5+ At the very left-hand end, pull over the small bulge and mantel awkwardly.
50) BLUNT ELIMINATE - Font 6b Also on Blunt Arete, reach up for a sloper above the nose with the left hand then use a tiny vertical edge to the right to assist the slap for the top.
51) COCK OVER - Font 5+ One metre right of Blunt Arete, stretch up to the left end of a sandy scoop.
52) OVER COCK - Font 4 The easiest way; follow the sandy scoops leftwards to the top.
53) THREE JUG WALL - Font 6a Just left of the centre of the wall, sandy moves lead to obvious chipped holds up a faint upper arete. With that landing, classifies as high-ball!.
54) UNDER PULL - Font 6a+ At the centre of the wall, a very awkward first move leads to chips and a scary finish. High-ball.
55) CROSS OVER - Font 5+ From a sandy sidehold at the base of Under Pull, stretch strongly up right and cross though wonderfully to join Up and Over.
56) UP AND OVER - Font 5+ Pull over the overhang 1m left of the right-hand corner of the sandy buttress to a bucket, then up. Harder for the short.
57) Font 4 As for the previous route, but escape rightwards into the corner.
58) YENDOR - Font 6b A scarey traverse. Start from Up and Over then swing leftwards high along chips to finish well left of the faint arete on Problem Three Jug Wall. Stay calm; to run out of energy would be messy; just look at that landing!

59) Font 5 The narrow wall just right of the corner crack.
60) Font 6a Eliminate on problem 53. Start at the middle of the wall. Only use the large break and the pocket in the middle of the wall for hands, then reach for a horizontal crack 3-6" below the top.

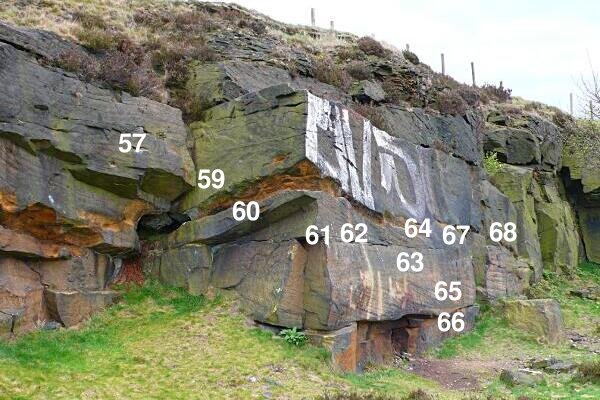
61) MAN UTD ARETE - Font 4 The attractive arete, direct.
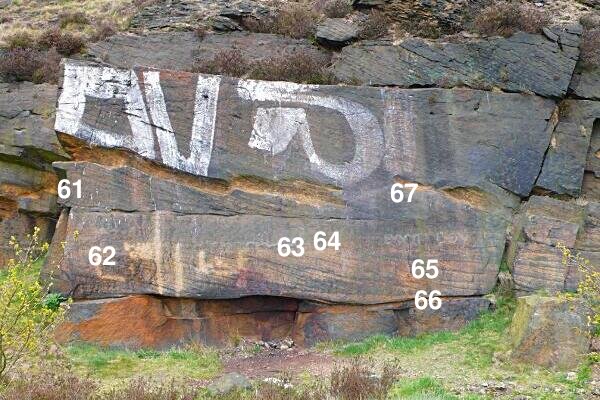
62) Font 6a Just right of the arete; low start on undercuts, no arete. Avoid the finish; loose blocks
63) Font 6b+ Four metres right of the arete are three chips. Use the left-hand two to get to the rail.
63a) FIRE PIT - Font 6c A sit start for the previous problem which adds a little difficulty and makes it a better problem. From the low flake and sloping foot hold pull hard for the right hand of the 2 chips, undercut slapping and hidden footwork will get you to the other chip and into the stand up problem.
64) Font 5+ Four (and a little bit) metres right of the arete, muscle up the two right-hand chips to the sandy rail.
65) PIT VIPER - Font 6c From a sitting start pull off the ground, hanging with both hands on a small finger-ledge. Use small sharp holds to pop for the ledges above.
66) VIPER PIT - Font 7a Lying down start to Viper Pit
67) THE MAN UTD TRAVERSE - Font 6a Six metres right of the arete, starting just left of a boulder, pop up to the sandy scoops then hand-traverse leftwards along the sandy rail to finish up Man Utd Arete. Hands no higher than the sandy rail. More strenuous than it looks.
67a) Font 7a+? PROJECT Start up Problem 62 then shuffle rightwards along the faint break below the obvious hand rail (Grade TBC).
68) Font 5+ The slabby wall to the right has a couple of reachy problems.
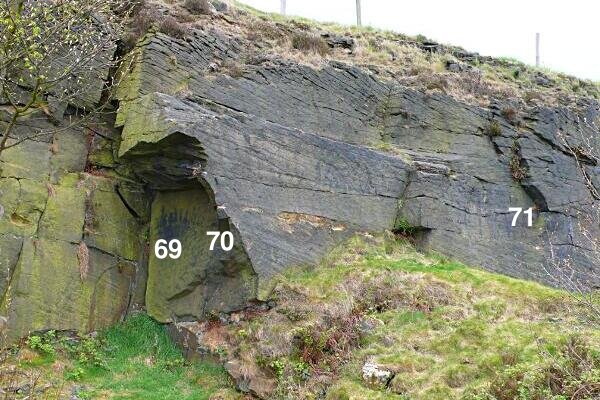
Several metres over to the right, at a rise, is a narrow overhanging face:
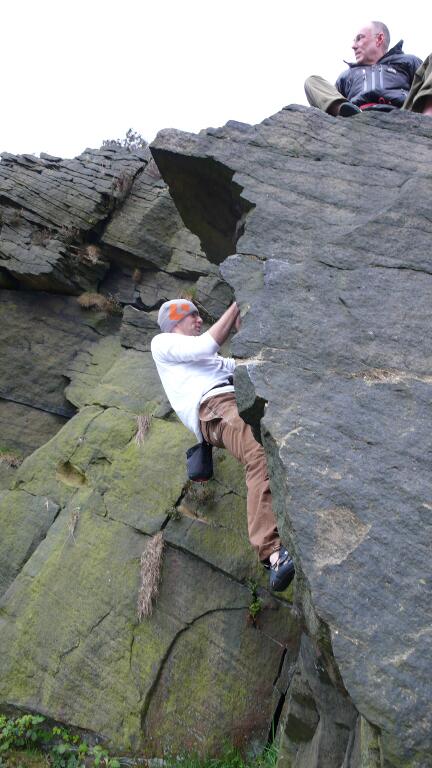
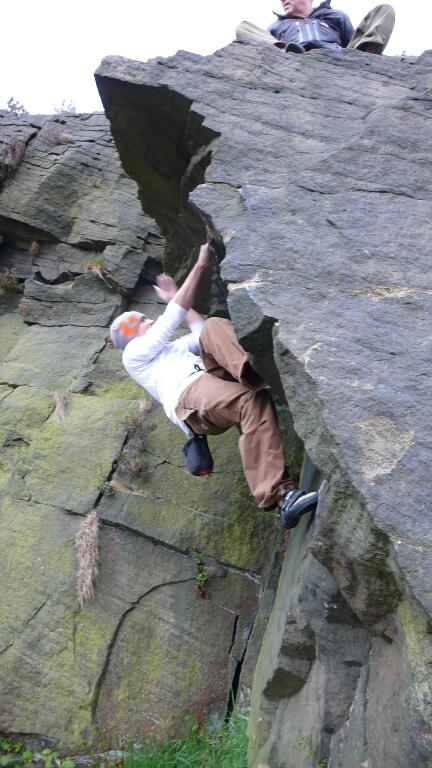
69) Font 6a The overhanging face can be taken direct via two finger holds over the lip, scarey.
70) Font 5 The right-hand side of the narrow overhanging face.
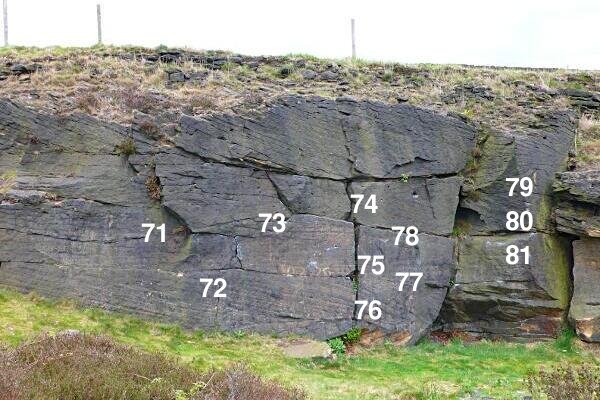
Six metres right, beyond an easy low bit, a flakey flake marks the beginning of the more worthwhile ELIMINATES' WALL.
71) Font 3 The very easy flake.
72) POCKET WALL - Font 5+ Immediately right, a very short thin crack low down and finger pockets leads to a slightly loose top.
73) Font 3 From a flat boulder, up past a small left-leaning crack.
74) THE FIST-SIZED CRACK - Font 3 just right, and the faint leaning feature above.
75) THE FIST-SIZED CRACK ELIMINATE - Font 6a You could jam The Fist-Sized Crack but don't bother; layback its right edge all the way to the top... no horizontal holds for hands! An eliminate.
76) THE FIST-SIZED CRACK ELIMINATE ASSIS - Font 6a+ The sitting start to The Fist Sized Crack, no using the crimp on the face to start!
77) Font 5 Immediately right again, pass the horizontal break and small pocket then stretch up the top wall. The short will find the top wall harder or impossible.
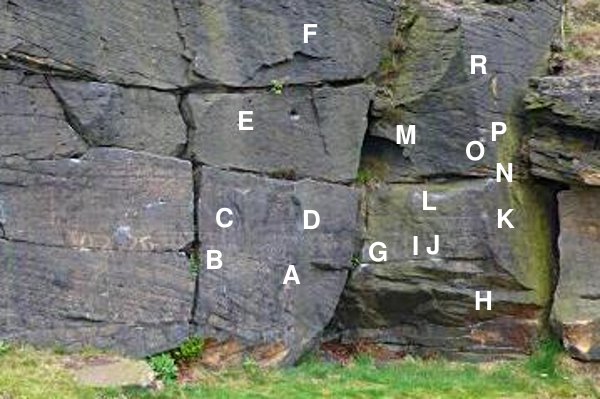
78) Font 6a The same problem as 77, eliminating everything except the start hold (A), a side hold to the left (C), two monos (E), the undercut (F) to the top (or a scuttle off sideways if you are short).
79) NICE ARETE - Font 5+ The little rib with the undercut base. Pull up from a sitting start and onto the rather nice little rib. Rather pleasant. Feet are allowed on the bottom ledges to start this and the next two problems.
80) NICE ARETE LEFT - Font 6a is an eliminate: H (right hand), I (left hand), L (right hand, this time), M (left hand), then streeetch for the very top.
81) NICE ARETE RIGHT - Font 6a is another sad eliminate: H (match), L (left hand, no matching!), P (note: just around the arete for the right hand), R.
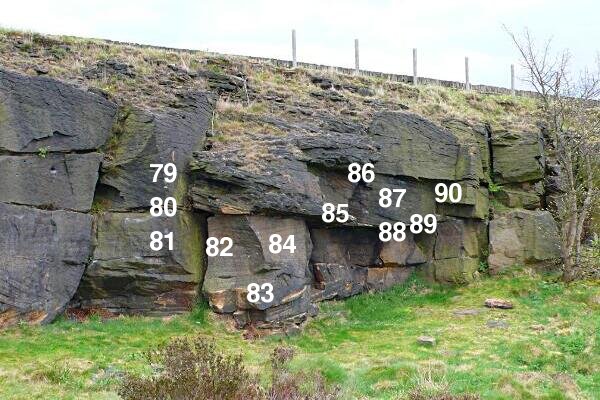
82) Font 3 The adjacent small square face. Take care with the rock at the top.
83) SUNSET BOULEVARD - Font 5+ An eliminate between problem 73 and 74. Start from sitting under the obvious block then mantle the block using only the block and obvious low crimp, once over the block reach straight up for the good holds above.
84) Font 3 Just right, the small face and overlap.
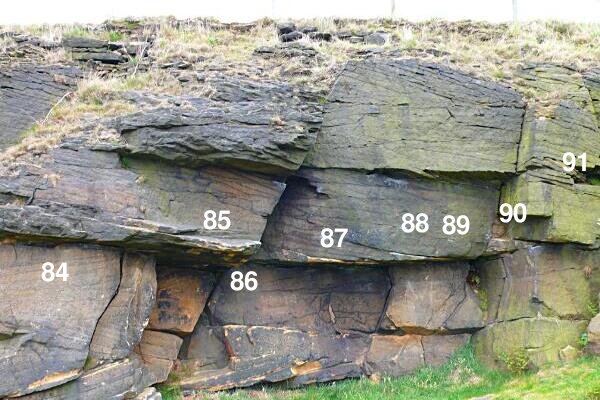
85) THE SHELF - Font 5+ To the right is a most bizarre undercut shelf. Pull up and roll onto this anywhere. Don't roll off.
86) THE GROOVE - Font 5+ The obvious slanting deep recessed groove/crack has an awkward finish. Feels high; take care.
87) LAY OF MAN - Font 6a From the base of The Groove, go up then lean out right onto the WF wall to reach the jug half-way up Fist of Fury.
88) FIST OF FURY - Font 6a Pop up the centre of the WF wall (various combinations, no bridging right), then finish with a high feel.
89) Font 5+ Snatch similarly to the good hold at the right side of this wall.
90) Font 3 The short pleasant corner immediately right.
91) Font 4 The adjacent, equally pleasant short arete.
92) TRANCE ATLANTIC - Font 6a+ A traverse of the Eliminate's Wall. Start steeply up Problem 62, then traverse rightwards along the adjacent low wall (no hands on the top, surprisingly awkward if you don't cheat). At Pocket Wall, keep hands below the shelf (crux). Continue rightwards, dragging your bum under Nice Arete. Swing along with hands on The Shelf. Use Lay of Man to cross the WF wall at mid-height and finish up the pleasant corner at the right-hand side.
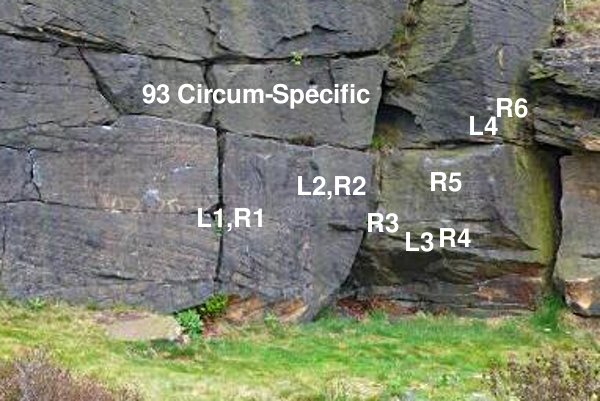
93) CIRCUM-SPECIFIC - Font 6c An eliminate variation on Trance Atlantic. As for the normal voyage until The Fist-Sized Crack, then: B (match), D (match), no more feet on the low shelves after this point(!)' G (right hand), I (left hand), J (right hand), L (right hand, oy! no matching), O on the arete (left hand), P (right hand).