 Click here
Click here for the "Below the Road" problems guide (sectors E to G).
Buckstones Edge, also know as Nont Sarah's, has a collection of around 140 local boulder problems in a superb moorland location with fantastic views. Most problems are on natural gritstone of good quality.
The problems can be split into two distinct sections.
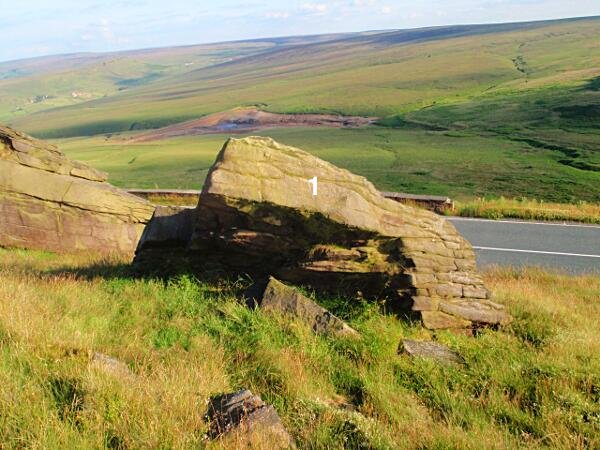
The "Above the Road" problems, which are uphill of the A640, starting from where a large boulder almost touches the road, around 300m right of the Buckstones Hotel. They are described on this page and consist of sectors A to D.
The "Below the Road" problems are in the area directly downhill of the main car park which is popular in summer with a variety of different people. This area has the higher concentration of harder boulder problems but also has a good range of easier problems with nice flat grassy landings. These are in sectors E to G. Click here for the "Below the Road" problems guide.
ACCESS
Easy to find as the parking area is directly off the A640 New Hey Road where it meets the B6114 Saddleworth Road
![]() An easy to print PDF TOPO guide to all the problems can be downloaded from here
An easy to print PDF TOPO guide to all the problems can be downloaded from here
BETA ALERT!
Click on the camera icon ![]() to view images of the problems being climbed or click on the video icon
to view images of the problems being climbed or click on the video icon  to view videos of the problems being climbed.
The Problems
Hovering your mouse over, or clicking on, the name/grade of the problem will show the problem highlighted on the topo photograph below.
The Problems are described from left to right and are split into 4 main sectors as shown by the markers on the above map.
Sector A
1) Font 5 Traverse the overhang on the low boulder from left to right.
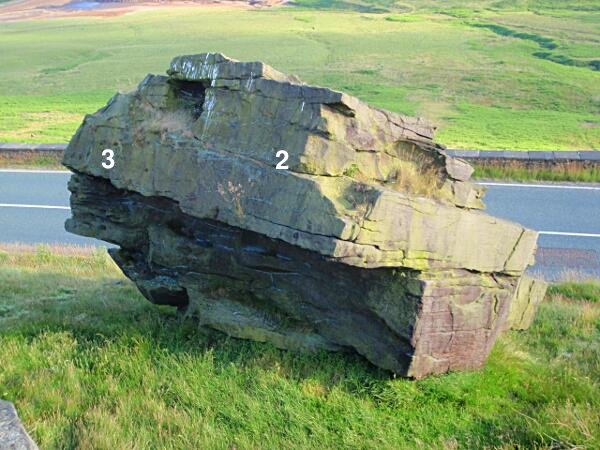
2) APE UP - Font 4 The right side of the overhang
3) Font 3 The overhanging arete

4) Font 3 Up the wall
5) Font 3 The sloping top via the crack and round hole
6) Font 5 Sit start under the crack, traverse right to finish up Problem 4
7) Font 4 The wall with the bulge to the round hole
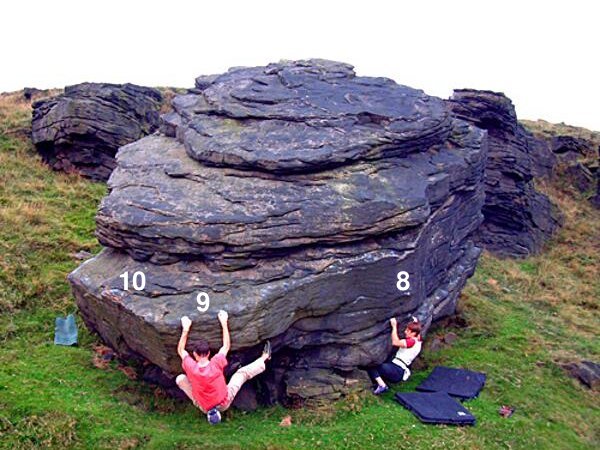
8) SLOPEY LIP TRAVERSE - Font 6B+ A clockwise traverse of the boulder from the easy ground at the back, feet on the lip (not the backwall) at the lowest point then finish up APE UP
9) Font 3 Mantle the sloping top of the boulder at it's lowest point
10) Font 6a Mantle the top again and then traverse left to finish up APE UP
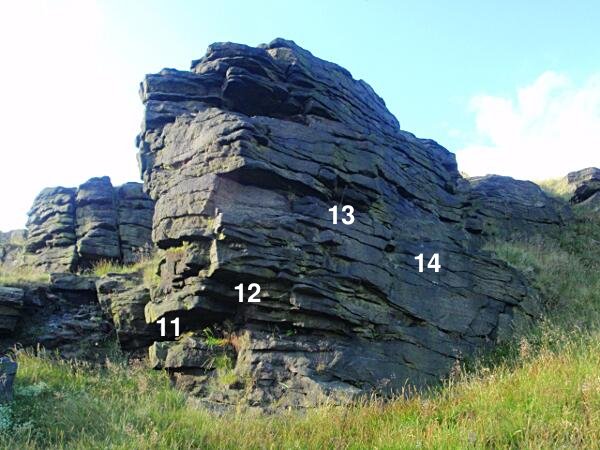
11) Font 3 The Arete
12) Font 3 The face
13) Font 3 The middle of the wall
14) Font 3 The wall just right
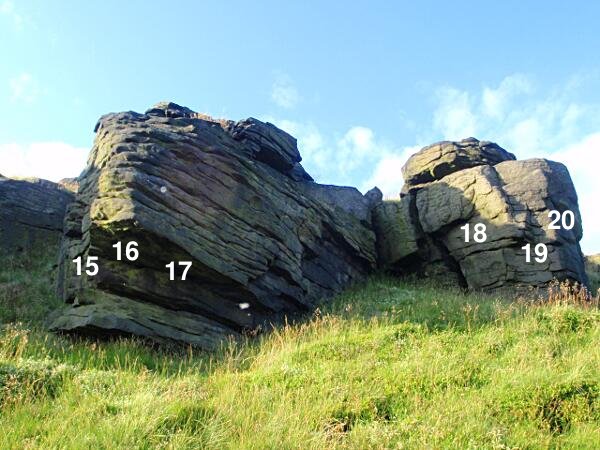
15) Font 3 The short wall
16) Font 4 Sit start the overhanging nose
17) Font 3 Up the holes to the break then top out
18) Font 3 The overhanging wall
19) Font 3 The arete
20) Font 3 The wall
Sector B
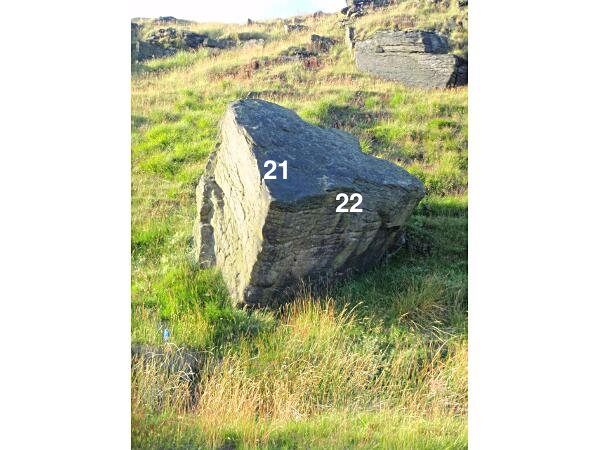
21) Font 6b Traverse the top of the boulder anticlockwise from the lowest point and finish up the scoop
22) Font 4 Mantle the scoop
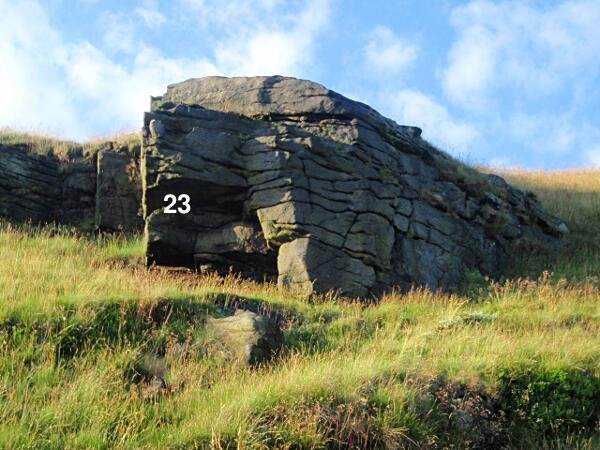
23) Font 3 Sit start the overhanging nose
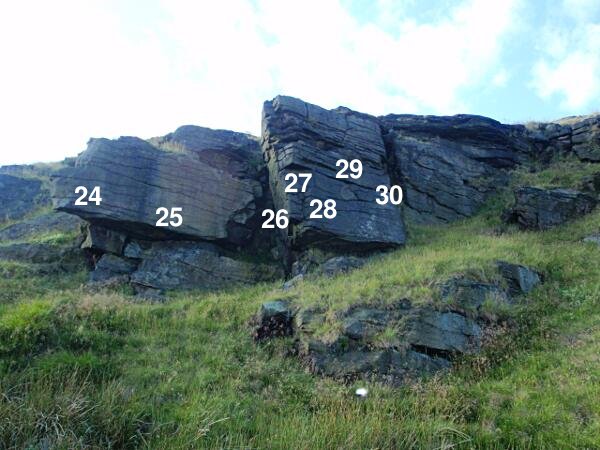
24) Font 5 The overhang
25) Font 3 The centre of the wall
26) Font 4 The centre of the sidewall
27) Font 5 The arête
28) Font 3 The left side of the slab
29) Font 3 The centre of the slab
30) Font 3 the right side of the slab
Sector C
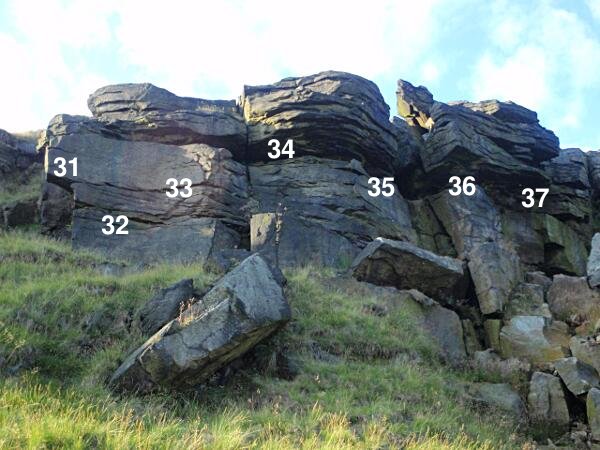
31) Font 3 Sit start the overhanging nose
32) Font 3 The left side of the wall
33) Font 3 Up the scoop
34) Font 4 Up the left face from the ledge between the boulders
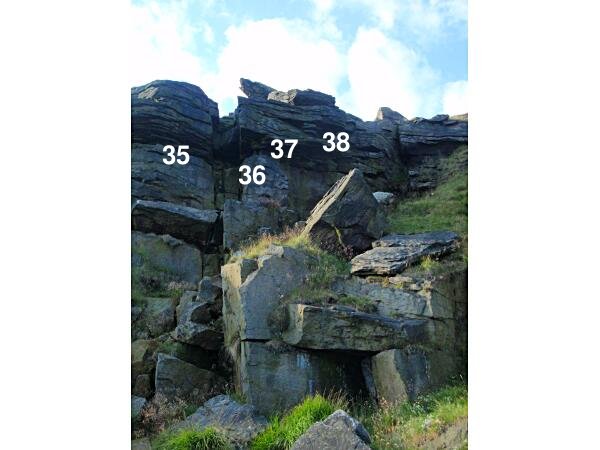
35) Font 4 The side wall, beware the loose rock
36) Font 5 The wall
37) Font 5 Use the wide crack and flakes to gain the steep overhang
38) Font 5 Go up the short side wall on suspect flakes
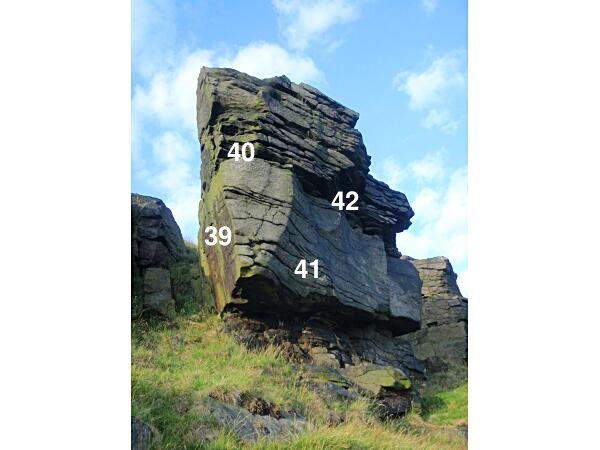
39) Font 3 Up the gully is a worthwhile overhanging face
40) JAMES'S PROBLEM - Font 5 Using the ledge on the arête pull up to the odd foothold and finish direct
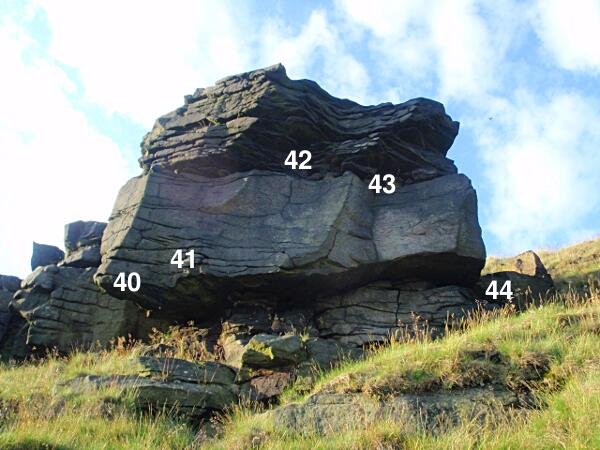
41) Font 4 The left hand scoop moving left to the arete
42) Font 5 The large scoop moving right
43) Font 4 The wall
44) Font 3 The side wall around the corner
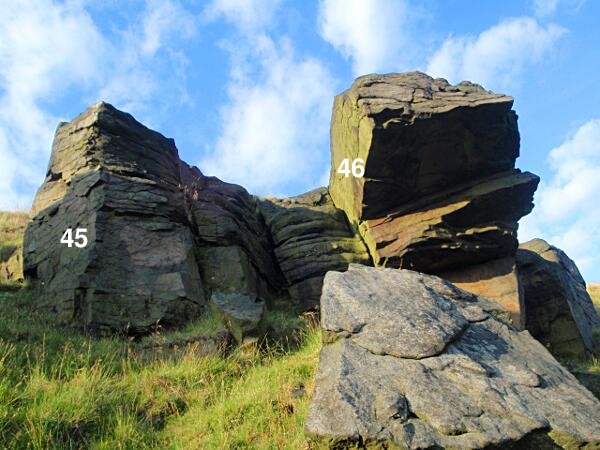
45) Font 3 The wall
46) MONKEY GYM - Font 6a At the left hand side of the big roof pull through to the arête
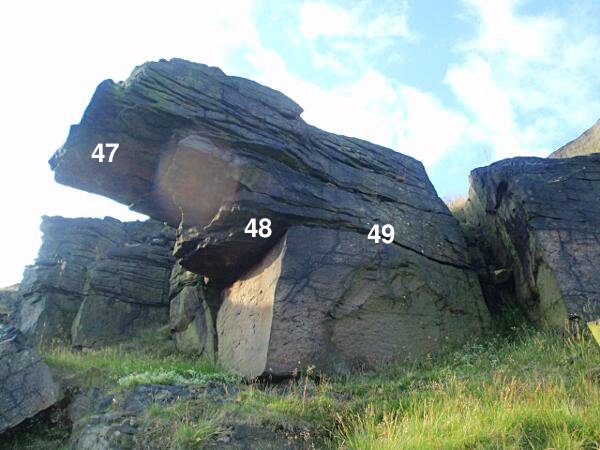
47) MAXIMUS LAXATIVE - Font 7a The reachy centre of roof direct on flakes
48) Font 3 The right side of the roof, finish left at the highpoint
49) Font 3 The short wall.
Sector D
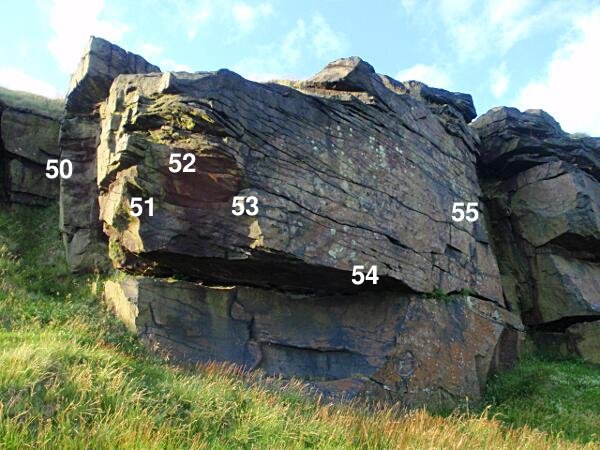
50) Font 3 Up the wall and over the nose
51) Font 3 The arête
52) Font 4 The nose
53) THE LANGSTER - Font 7a From the horizontal break rock right over to the small crimp and then up the ripples
54) Font 6b The centre of the wall from the undercut
55) Font 5 The square arête
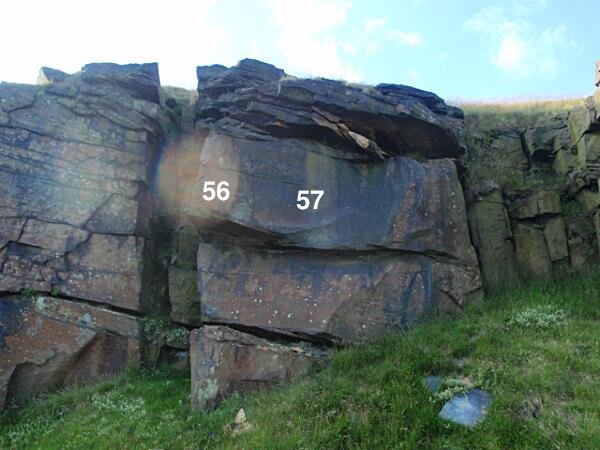
56) Font 5 The overhanging arête
57) Font 4 The wall and overhang
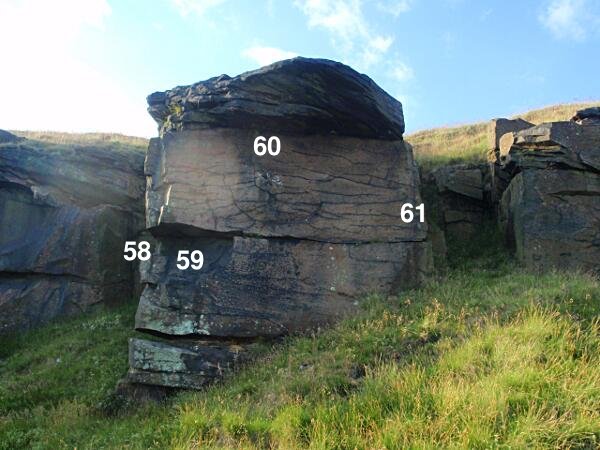
58) Font 3 The short wall
59) Font 6a Sit start the arête using the crack.
60) Font 6a The small face
61) Font 4 The right edge of the face
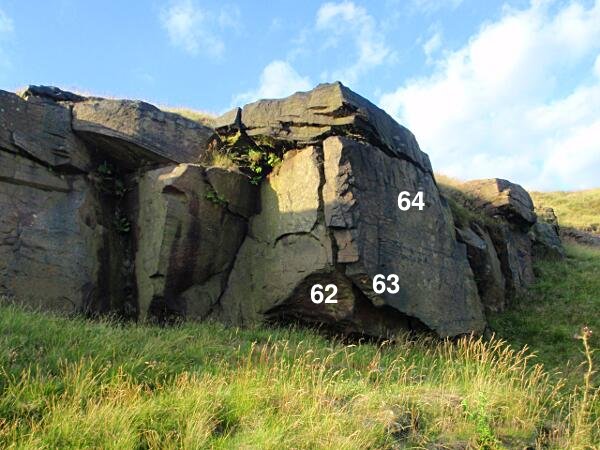
62) Font 6a Sit start the wide crack.
63) Font 4 The arete, the crimps on the face are in
64) Font 5 Get to the top via the slopers
Photographs and videos of any problems are more than welcome and can be included on the site.
Details of new problems and opinions on grades will be gratefully received, see the Contact button at the top right of this page or click here